
Paper snowflakes are a great decoration idea for Christmas!
Why ? Because it's super easy to do and it's not expensive.
This is my favorite DIY activity to do with the kids before Christmas.
All you need is a sheet of paper and a pair of scissors.
Today I show you my easy tutorial to create these beautiful snowflakes in 5 min .
I also added 9 snowflake patterns to make different shapes. Print, fold and cut and that's it! Watch:
- scissors
- white printer paper standard size (A4)

First, cut the sheet of paper to make a square.
Here's how to cut a sheet of paper to make a square:
- Fold one of the bottom corners diagonally to the opposite side.
- Align both edges well and press firmly to crease.
- You get a perfect triangle, with a long strip in the shape of a rectangle on top.
- Use the scissors to cut the rectangle above the triangle. Unfold it and you get a perfect square!
- All you have to do is follow these steps:



Start by folding the right part of the triangle towards the center, by a third.

If necessary, adjust the folds until you have 3 equal parts with the edges perfectly aligned.
This step is even easier if you use the templates below, because the bend lines are drawn there.
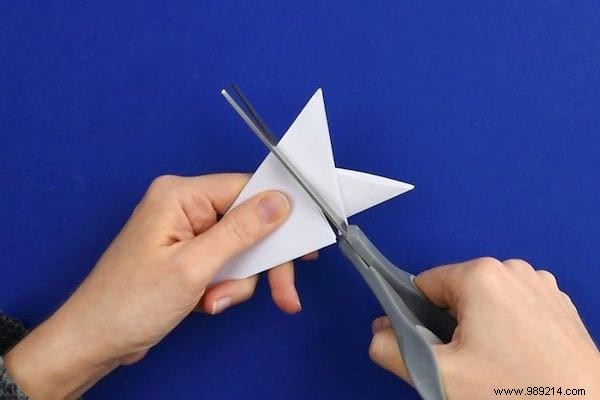
If all goes well, you get a nice paper triangle like this:


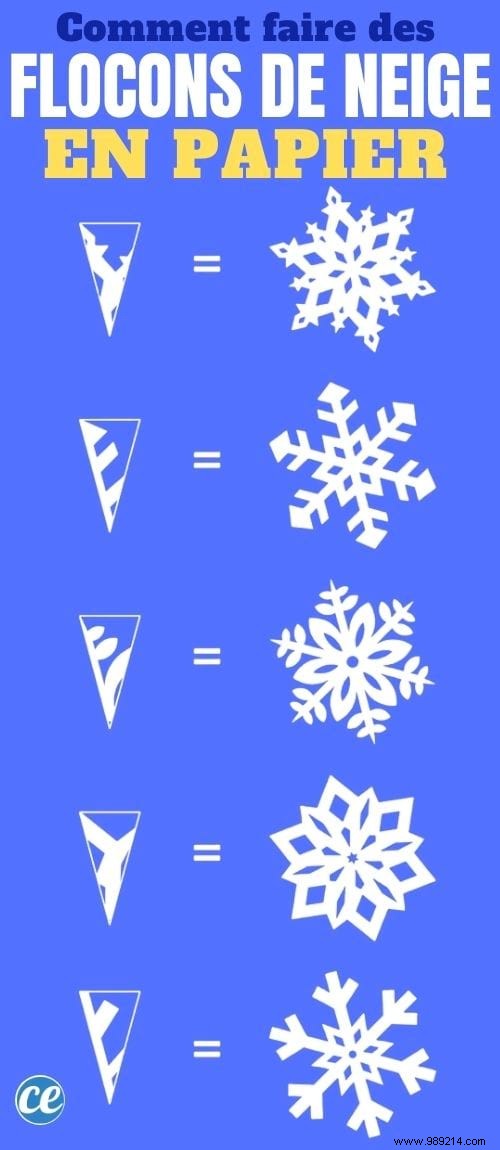
Let loose, this is the time when you can be creative!
You can cut all kinds of patterns:triangles, diamonds, circles, and even half-hearts.
If you cut off the tip, you get a snowflake with a hole in the middle.


There you go, now you know how to make paper snowflakes :-)
Easy, fast and efficient, right?
Now you can hang them in front of a window or on the refrigerator.
Or even better, hang your snowflakes from the ceiling with fishing line and a piece of tape.
How amazing to see the beautiful snowflakes that can be made with just a few scissors!
It really is a great DIY activity to do before Christmas, and a fun way to create your own decorations to keep all winter long!
With us, all members of the family get involved:children, teenagers, adults and even grandparents.
If you want your snowflakes to be perfectly flat, use an iron set to a very low temperature.

And to make it even easier for you, I've also created 9 Paper Snowflake Templates .
All you have to do is choose a template, print it out and give it a few snips to create the perfect snowflake!
The 9 models are numbered in the image above.
Select the snowflake of your choice, and click on its corresponding link to easily print the model in PDF.
Then, print the template on an A4 sheet of paper, and follow the exact same steps as mentioned before.
With the marks, it's even easier to know where you have to make each fold and each cut.
When making the folds, just be sure to keep the lines on the outside of the paper, so they are always visible.
Indeed, if the lines are inside the folds, you will not see them anymore or you will not know where to make the cutouts of the model.

Click here to easily print model nº1 in PDF.

Click here to easily print model nº2 in PDF.
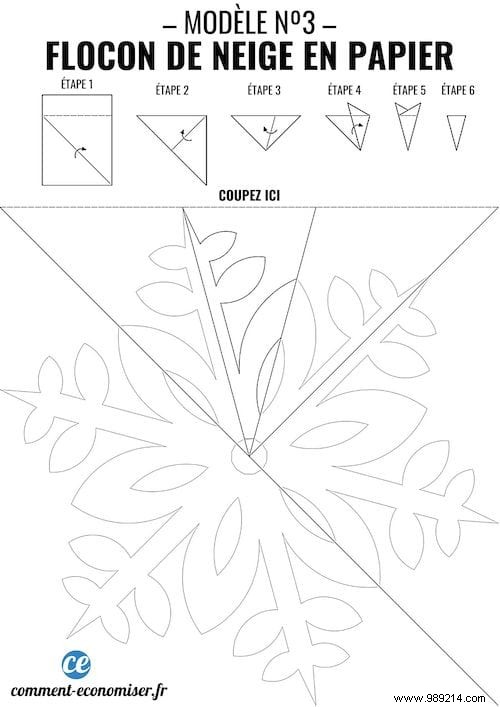
Click here to easily print model nº3 in PDF.

Click here to easily print model nº4 in PDF.
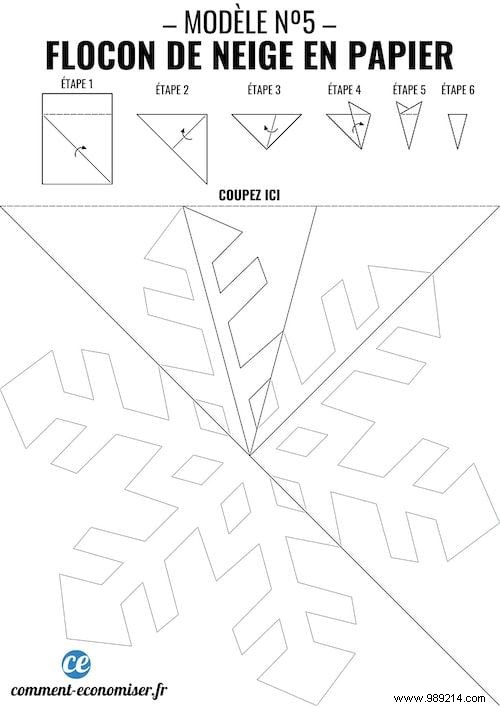
Click here to easily print model nº5 in PDF.

Click here to easily print model nº6 in PDF.
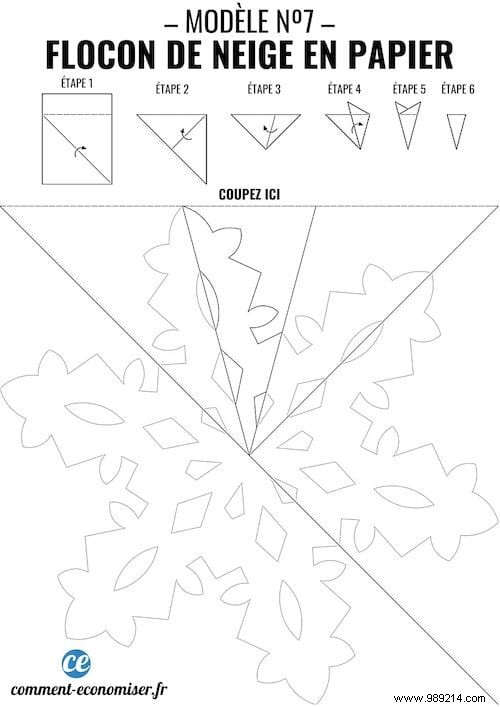
Click here to easily print model nº7 in PDF.
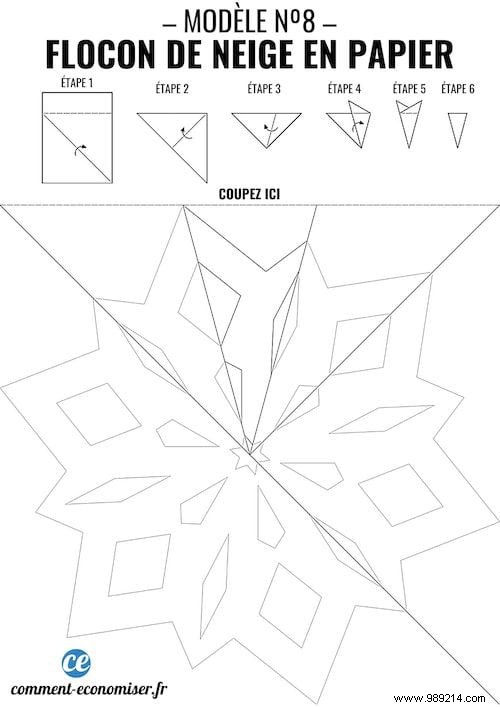
Click here to easily print model nº8 in PDF.

Click here to easily print model nº9 in PDF.
Looking for even more Christmas decoration ideas?
Here are some of my favorites:
- Christmas decorations with pine cones
- Christmas tree ideas
- Christmas decorations with toilet paper rolls
- method to make Christmas balls in 10 minutes flat
- recycle your old objects into Christmas decorations
- chair covers in the shape of a Santa Claus hat